Pre-order deals: new 2.0 display kits

Early bird deals for our next-generation Artist Booths kits.

Days
Hours
Minutes
Seconds

Artist Back Alley Resources Blog

Small Table Layouts That Don't Feel Cramped

We get asked about small table layouts constantly. Here are the questions that come up the most, with honest answers from what we have seen work across thousands of vendor setups. How Do I Fit Enough Product On A Single Table Without It Looking Messy? Build up, not out. A single 6ft table gives you plenty of surface area if you are not trying to use ALL of it for product. Use a modular display kit to create vertical tiers. Your table surface becomes the ground floor. Shelves at different heights become additional floors. Same footprint, three times the display space. The key is leaving gaps. Not every shelf needs to be full. Empty space between product groups tells customers "these are different things" without needing labels or dividers. What Size Kit Works Best For A Standard 6ft Table? A Core kit (24 panels) is the starting point for single-table setups. It gives you a backdrop plus two to three shelf tiers, building five panels high at 175cm. If you want side returns (panels that wrap around the edges of your table), step up to the Shapeshift at 46 panels. The full kit range breaks down the differences. Should I Leave Space For Customers To Step Into My Booth? At a single table, no. You are not running a walk-in shop. Keep yourself behind or beside the table and let customers browse from the aisle side. The goal is to maximise your display area, not create a miniature retail store. How Do I Handle Products That Need To Be Touched Or Tested? Put touchable products at the front edge of the table, closest to the customer. Everything behind that front row can be display-only with samples or testers at the accessible edge. Vertical shelving keeps the "look but do not grab" items elevated and safe while the front row stays within arm reach. What About Signage? Where Does It Go Without Eating Display Space? Top of your display frame. The highest shelf or panel becomes your sign. Clip it, lean it, or hang it from the top tier. This puts your branding at the highest visible point (above product, above eye level) where it catches attention from the aisle without taking space away from merchandise below. My Products Are All Different Sizes. How Do I Make It Look Cohesive? Group by size, not by category. Small items together on one shelf, medium on another, large pieces as standalone features. When similar-sized objects are grouped, the display looks intentional even if the products are totally unrelated. The 5kg shelf capacity on each tier handles everything from sticker packs to ceramic pieces without worrying about weight. I Am Flying To An Event. Can I Really Travel With A Full Display? Yes. The kits pack flat to 56x36x23cm, which is carry-on size on most airlines. Frosted PP panels do not crack in luggage. We ship from Sydney to 50+ countries and vendors regularly fly domestically and internationally with their kits. No checked luggage dramas, no shipping costs, no praying it arrives on time.

Getting The Most Out Of A Quarter Booth At A Big Con

Quarter booths at big conventions are brutal. You get a tiny slice of table, maybe 90cm, surrounded by neighbours on both sides, with an aisle full of people who are already overwhelmed by sensory overload. Most vendors treat it as a throwaway. A place to test the waters. Almost an apology for being there. That is the wrong way to think about it. A quarter booth at a big con puts you in front of more foot traffic than a full booth at a small market. The audience is already there, already spending money, already in buying mode. Your only job is to make them stop for three seconds. Height does that. When everyone around you is flat on the table, the vendor with a vertical display that builds up to 175cm catches eyes from down the aisle. You become a landmark. People navigate BY your booth. "Meet me at the one with the tall display." A Core kit (24 panels) is perfect for quarter booths. It sits on your portion of the table, builds upward, and gives you shelving tiers that a flat layout cannot. The 35x35cm panels and connectors set up in under 30 minutes with no tools. Your neighbours will still be arranging their tablecloths while you are already open for business. The other thing that works at quarter booths: restraint. Do not try to show everything. Pick your five best sellers and give them room. A curated selection in a small space reads as "exclusive." A crammed selection reads as "clearance bin." Your modular display packs into a 56x36x23cm case when you are done. You do not need a trolley, a van, or a friend to help carry. You walk in, set up, sell, pack down, and walk out. That efficiency is everything at big cons where load-in windows are tight and parking is a nightmare. Stop thinking of quarter booths as compromise. Start thinking of them as concentration. The full kit range has sizes for every booth footprint.

Why Small Booths Need More Planning, Not Less

8 Planning Steps That Small-Booth Vendors Skip (And Regret) There is a myth that small booths are easier. Less space, less to worry about, right? Wrong. A small booth has zero margin for error. Every centimetre counts. Here are the planning steps that separate the vendors who thrive in small spaces from the ones who struggle. Measure your table before you plan your display. "6ft table" varies. Some event tables are 152cm, some are 183cm. That 30cm difference changes your entire layout. Bring a tape measure to your first event or ask the organiser for exact dimensions. Mock up your layout at home first. Set up your actual table. Place your actual products. Build your modular display and load it. Take a photo from three metres away. That photo is what customers see. If it looks cluttered or empty in the photo, fix it before the event. Decide your hero product BEFORE the event. In a small booth you can only spotlight one thing. Everything else is supporting cast. If you have not decided what the star is, customers will not either. Plan your checkout zone. Your payment terminal, bags, and wrapping supplies need a dedicated spot that does not eat into display space. One corner, as compact as possible. Plan it, do not let it just happen. Account for YOUR body. You have to stand or sit somewhere. In a small booth, where you stand affects what customers can see and reach. Stand to one side, not dead centre behind the table. Plan your restock flow. Where is backup stock? Can you reach it without dismantling your display? A vertical display with 5kg-rated shelves solves this because your lower shelves become hidden storage while upper shelves display. Check the lighting situation in advance. Small booths in convention halls often end up in dim corners. Bring your own lights. Clip-on LEDs that attach to your display frame fix this instantly. Plan for the worst lighting scenario. Have a packdown sequence. When you are tired after a full day, you will forget steps. Write down your teardown order. Products off first, shelves second, display frame last, all into the flat-pack case. Having a system means a 15-minute packdown instead of a 40-minute scramble. The full kit range is designed for fast teardown with no tools needed.

Building A Display That Breaks Down To Fit Under Your Bed

Storage Is The Problem Nobody Talks About Every vendor guide talks about how to set up your booth. Almost none of them talk about where you put everything when the market is over. And if you live in a small apartment (which, let us be honest, most of us do), this is a REAL problem. Wooden shelves live in the garage. Metal grid walls lean against the wall in your spare room. PVC pipe frames get shoved into a closet and fall over every time you open the door. Most display solutions are built for the event and completely ignore the other 350 days of the year. What "Packs Flat" Actually Means There is a difference between "packs flat" and "packs small." A lot of displays fold flat but are still huge. A grid wall folds flat but it is still a metre wide. Not exactly sliding under your bed. Our modular display kits break down into individual 35x35cm panels and small ABS connectors. The whole thing (even the 92-panel Shapeshift Duo) fits into cases. A Core kit packs into a single 56x36x23cm case. That is literally carry-on luggage size. Under your bed. Top shelf of your wardrobe. In the boot of a hatchback. Behind the couch. Wherever you have got a suitcase-sized gap, you have got room for your entire display. Setup Speed Matters Too If your display takes an hour to build, you dread setting it up. You start cutting corners. You skip shelves because "it takes too long." The display gets simpler and worse over time because the setup process is fighting you. Click-together panels with no tools needed take under 30 minutes to build. Most vendors get it down to 15 or 20 minutes after a few events. Teardown is even faster. That matters at 5pm on a Sunday when you have been standing for eight hours and you just want to go home. The Travel Factor If you fly to conventions or take public transport to markets, your display needs to survive luggage handling. Frosted PP panels do not crack or dent like wood or acrylic. They are light, flexible, and they have survived checked luggage for thousands of vendors shipping from our Sydney warehouse to 50+ countries. Browse the full kit range if storage and transport are priorities for you. Every kit in the range packs flat and ships in the same compact format. Frequently Asked Questions How heavy is the packed kit?A Core kit is light enough to carry one-handed. Even the Shapeshift Duo stays manageable because the panels are made from lightweight PP, not wood or metal. Will the panels get damaged stored under a bed?No. The frosted polypropylene is flexible and does not crack, warp, or scratch easily. It handles being stored flat in tight spaces without any issues. Can I check it on a flight?Yes. The 56x36x23cm packed size fits within most airlines carry-on limits. Vendors regularly fly with their kits domestically and internationally.

The Truth About Just Get A Bigger Table Advice

Why "More Space" Is Almost Never The Real Answer It is the most common advice in every vendor Facebook group: "Just get a bigger table." Or "upgrade to a double booth." And look, sometimes that IS the right call. But most of the time it is expensive advice that does not fix the actual problem. The actual problem is almost always vertical space, not horizontal space. A 6ft table gives you about 1.1 square metres of surface area. That is plenty for most product lines. What it does NOT give you is height. And height is where visibility, shelving, and customer engagement all live. The Cost Of Going Bigger A double booth at a convention costs double. Obviously. But it also means twice the setup time, twice the teardown, and you need to fill twice the space with product and display materials. We have seen vendors upgrade to a double and end up with a booth that looks half empty because they did not have enough stock or display infrastructure to fill it properly. Compare that to building upward on your existing table with a modular display kit. A Core kit (24 panels) gives you 175cm of vertical display space. You have just tripled your usable display area without paying a cent more in booth fees. When Bigger Actually Makes Sense There ARE situations where a bigger table or double booth is the right move. If you have large products (paintings, furniture, clothing racks) that genuinely need floor space, go bigger. If you want a customer interaction area inside your booth for fittings or demos, you need room for that. But if you are selling prints, jewellery, ceramics, stickers, candles, or any small to medium goods, a single table with a proper vertical display outperforms a double booth with a flat layout almost every time. The Smart Upgrade Path Start with one table and a vertical display. Master your layout. Learn which products sell from which positions. Then if you genuinely run out of room, grab a Shapeshift (46 panels) or full Shapeshift Duo (92 panels) from the full kit range for more side coverage before you spend hundreds more on a bigger booth. Frequently Asked Questions What if the event only offers one table size?Most events use standard 6ft (180cm) tables. Our kits are designed to fit that exact width. You are sorted. Can I use a vertical display AND a bigger table together?Absolutely. If you do upgrade your booth space later, the modular system scales with you. Add more panels, build wider configurations, or create L-shaped layouts. Everything is cross-compatible.

How To Layer Product Without Cluttering A Tiny Table

A vendor we spoke with last year had a problem. She made hand-poured candles, about 30 different scents, and she wanted all of them on display at a weekend market. Her table was a standard 6ft folding table. Not exactly generous. Her first attempt was to line them all up in rows across the table. Three rows deep, labels facing out. It looked like a supermarket shelf. Customers would glance, see the wall of identical jars, and keep walking. The Fix Was Layering, Not Editing The instinct is to cut your range. Show fewer products. But that was not the real problem. The problem was that everything was at the same height, the same depth, the same visual weight. Nothing stood out because nothing was DIFFERENT. She started building upward with a modular display kit, using the shelves to create distinct tiers. Best sellers at eye level on the top shelf. Seasonal scents on the middle tier. Discovery scents (the weird ones, the conversation starters) right at the front of the table where people could pick them up. Suddenly the same 30 candles told a story. There was a clear hierarchy. Customers knew where to look first and where to browse after. The Rules She Landed On After a few markets of experimenting, she had a system. Hero products go at eye level (the third or fourth shelf up on a five-high display). Midrange products fill the middle shelves. The table surface itself is for touchable, pick-up-and-smell items only. She kept gaps between groups. Not every shelf was full. The empty space between clusters was doing work: it was telling customers "these are different categories" without needing any signage. The display packed down flat after every event into a case that fit in her hatchback boot. No shelving units to wrestle. No milk crates. Just the 35x35cm panels clicking apart and sliding into a 56x36x23cm bag. Last time we checked in she had upgraded from a Core (24 panels) to a Shapeshift (46 panels) because she wanted side returns to create a more enclosed, boutique feel. The full kit range made that upgrade seamless since all the connectors and panels work together. The lesson was simple. Layering is not about cramming more in. It is about giving every product a different stage so customers can see each one individually, even when there are 30 of them on one table.

Small Booth, Big Backdrop: Balancing Scale

We see this mistake constantly at conventions. Someone with a small table puts up a massive banner behind their booth. Floor to ceiling. Edge to edge. And it completely swallows their products. The backdrop becomes the booth. The actual products become footnotes. Here is the thing about scale in a small space: your backdrop should frame your work, not overpower it. Think of it like a picture frame. The frame is supposed to make you look at the picture, not the other way around. A display that is five panels high (175cm) on a standard table hits the sweet spot. It is tall enough to be visible from the aisle and create a proper backdrop, but it does not tower over everything and make your table look like a tiny afterthought. The best small-booth vendors we have worked with use their modular display as architecture, not decoration. The frosted panels become the backdrop AND the shelving system. Products sit on it, hang from it, lean against it. The display is not separate from the merchandise. It is part of it. If you are working a quarter booth or a single table, resist the urge to compensate with a huge banner. Instead, build upward with structure that actually holds and presents your products. Use the height for function, not just visibility. Start with a Core (24 panels) and see how much vertical real estate you actually need before sizing up. You can always add panels later. The whole system is cross-compatible across every size in the full kit range. Small booths do not need big backdrops. They need smart ones.

Making A Narrow Aisle Booth Feel Open

7 Ways To Open Up A Tight Booth Space Narrow aisle booths are the reality at most conventions. Here is how to make yours feel twice the size it actually is. Go vertical, not wide. When you cannot spread out, build up. A display that reaches 175cm (five panels high) draws eyes upward and away from the cramped footprint. A modular display kit gives you that height on a standard table without eating any floor space. Pull your table back from the aisle edge. Even 15cm of breathing room between your table edge and the aisle flow makes your booth feel less like a wall blocking foot traffic. People are more likely to stop when they do not feel boxed in. Use transparent or frosted materials. Solid wooden backdrops create visual walls. Frosted panels let light pass through, which tricks the eye into reading the space as larger than it is. The 35x35cm frosted PP panels in our kits do exactly this. Limit your colour palette to three colours max. A rainbow of tablecloths, signage, and product displays makes a small space feel chaotic. Pick two neutrals and one accent colour. Done. Create one clear focal point. Do not spread your best work across the entire booth. Group your hero products together at eye level in one spot. Everything else supports that focal point, not competes with it. Keep your floor clear. No boxes visible. No extra stock piled under the table where people can see it. A visible floor (even just the front edge) makes the whole booth feel less cluttered. Pack flat gear like our kits (56x36x23cm packed) tucked completely out of sight. Use lighting to define depth. A single light source flattens everything. Two or three small LED clips at different heights create shadows and layers, making the space feel three-dimensional even when it is barely a metre deep. Browse the full kit range for display options that give you multiple lighting attachment points.

The Folding Table Upgrade That Changes Everything

Your Table Is Fine. Your Display Strategy Is The Problem. Every vendor starts with the same setup: a folding table from the hardware store, a tablecloth, and products laid flat across the surface. It works. But "works" and "sells well" are two very different things. The single biggest upgrade you can make is not replacing your table. It is building UP from it. A vertical display turns that same 180cm table into a wall of product that catches eyes from across the room. We have watched vendors double their visibility just by going from flat-lay to shelved display. Why Vertical Beats Horizontal Every Time Think about how people move through a market or convention hall. They are walking. Their eyes are scanning at shoulder height, not looking down at tables. If your products are all flat on the table, customers literally cannot see them until they are standing RIGHT in front of you. A display that builds five panels high (about 175cm) puts your work at natural eye level. People spot it from the aisle. They walk over. That is half the battle won before you even say hello. The Setup That Fits Your Existing Table A modular display kit sits right on top of your folding table. No clamps, no drilling, no modifications. The 35x35cm frosted panels and ABS connectors click together in under 30 minutes without any tools. The Core kit gives you 24 panels to work with. That is enough for a solid backdrop with shelving. Need more? The Shapeshift runs 46 panels and the Shapeshift Duo goes up to 92, giving you side returns and deeper shelf configurations. Check the full kit range to compare. Packing It All Back Down Here is where modular really wins. Everything breaks down flat and fits into a 56x36x23cm case. That is carry-on luggage size. Try doing that with a wooden shelf unit or a metal grid wall. You toss it in the boot of your car, slide it under your bed at home, and pull it out again next weekend. No garage storage needed. No asking your mate if you can keep it at their place. Frequently Asked Questions Will the panels hold the weight of my products?Each shelf supports up to 5kg, which handles most art prints, jewellery displays, ceramics, and small goods without any issues. Do I need to buy a new table too?No. The display works on any standard 6ft/180cm folding table. Keep the one you already own. How long does setup actually take?Under 30 minutes. Most vendors get faster after a couple of events and knock it out in 15 to 20 minutes. No tools required, just click the connectors together.

Compact Displays For First-Time Vendors On A Budget

You Do Not Need A Massive Setup To Make Sales Here is the thing nobody tells you before your first market: the vendors with the biggest booths are not always the ones making the most money. Some of the best-selling stalls we have seen fit on a single 6ft table with room to spare. The secret is going vertical. A flat table covered in products looks busy and overwhelming. Stack things up and suddenly you have got breathing room, better sightlines, and customers can actually SEE what you are selling from three metres away. What To Spend On (And What To Skip) Skip the custom-built wooden shelves. Skip the heavy metal grid walls. You will hate carrying them by event number three. Put your money into a modular display kit that packs flat and sets up without tools. Our Core kit (24 panels) fits a standard table perfectly and builds five panels high, giving you 175cm of vertical display space. The whole thing packs into a carry-on sized case. Beyond the display itself, invest in good lighting (clip-on LED bars are cheap and effective) and a simple tablecloth in a solid colour that does not compete with your work. Layout Tips For A Single Table Put your hero products at eye level. That is the middle-to-upper zone of your display. Lower shelves handle inventory and backup stock. Top shelf is for signage or a few statement pieces. Leave some empty space. Seriously. A packed display reads as "garage sale." A curated display reads as "boutique." You want boutique. Keep your checkout area tight. One corner of the table with your payment terminal and bags is plenty. Do not let it eat into your display real estate. Frequently Asked Questions How much should I budget for my first display setup?You can get started with a Core 24-panel kit and basic accessories for well under what most people spend on a single craft fair table fee. Think of it as an investment that pays for itself after a couple of events. Will a modular display look professional enough?Absolutely. The frosted panels give a clean, modern look that works for everything from art prints to jewellery. Check out the full kit range to see what other vendors are building. What if I outgrow a small setup?That is the beauty of modular. Start with 24 panels, add more later. The connectors and panels are all cross-compatible across every kit size, from Core all the way up to the 92-panel Shapeshift Duo.

The Small Booth Checklist Nobody Gives You

You have read the guides. You have watched the TikToks. But when it comes time to actually pack for a small booth, you always feel like you are forgetting something. This is the checklist we wish someone had given us. No fluff. Just the stuff that actually matters when your space is tight. Do I Really Need a Display Stand or Can I Just Use Risers? Risers add height to your table but they eat table space doing it. A vertical display like a modular display kit adds height WITHOUT taking table surface. In a small booth, that distinction is everything. Your table surface is for products and transactions. Your vertical space is for display and brand presence. Keep them separate. How Many Products Should I Actually Display? Fewer than you think. On a small table, 8-12 products on the table surface and 10-15 on your vertical display is plenty. That is 20-25 visible items. Bring backup stock for anything that sells, but do not display it all at once. A clean booth with breathing room outsells a packed one every time. What If My Products Are Big and Take Up a Lot of Space? Show one on the table as a sample. Display photos of the range on your vertical wall. Take orders on the spot and ship later. Large product vendors who try to bring physical inventory for every option end up with a booth that looks like a warehouse, not a shop. Do I Need a Tablecloth? Yes. Always. A plain, solid colour tablecloth that reaches the floor on all visible sides. It hides your storage underneath, creates a clean visual baseline, and costs almost nothing. Avoid busy patterns. They compete with your products for attention. How Do I Handle Money and Payments in a Tiny Space? Dedicate one corner of your table to transactions. Card reader, a small cash box if you take cash, and your phone for Square or Shopify POS. That corner is sacred. Products do not go there. Keep it CLEAR so checkout is fast and does not require moving things around. What About Business Cards and Marketing Materials? One small stack of business cards in a holder. That is it. No pamphlets, no postcards unless those postcards ARE your product. A QR code on your display wall linking to your Instagram or website replaces everything else. Every piece of marketing material on your table is space that a product could be using instead. Should I Bring Bags? Branded bags if you have them. Plain paper bags if you do not. Keep them under the table in a box, not on the table surface. And make them small enough that you are not storing 100 oversized bags in your already-packed setup. Small purchases get small bags. What Is the Actual Minimum I Need for a Professional Small Booth? A tablecloth, a vertical display, your curated product selection, a card reader, business cards, and a smile. That is genuinely it. Everything else is optional. A Core kit with 24 panels, a solid tablecloth, and your best 15 products will look more professional than 90% of the booths at any market. Full range at the full kit range.

Fitting A Full Brand Story On A Table The Size Of A Desk

You have 90cm of table. Maybe 120 if the organiser is generous. And you need people to walk away knowing who you are, what you make, and why they should care. Not just "oh, cute prints." Your actual brand story. We have watched vendors try to solve this with banners, pamphlets, elaborate backstory cards, QR codes linking to their About page. None of it works. Nobody reads your origin story at a market. They are eating a sausage roll and walking fast. What DOES work is letting your display do the talking. Your brand story is not a paragraph. It is the feeling someone gets in the three seconds they glance at your table while walking past. That means your colour palette, your product curation, and your display style need to be doing all the heavy lifting. One artist we know sells hand-painted ceramics. Her brand story is "nature meets geometry." She does not write that anywhere. Her modular display kit is configured with alternating solid and frosted panels. Her ceramics sit on integrated shelves at staggered heights. The DISPLAY is the brand story. Organic shapes on a geometric grid. People get it instantly without reading a word. The mistake most vendors make with tiny spaces is trying to say too much. You do not need a banner, a bio, a mission statement, AND a product display. Pick one visual idea that captures your brand and let everything else serve that idea. Your logo at eye level. Your hero product front and centre. Your colour story consistent from tablecloth to business card. A small table forces clarity. That is its superpower. If you cannot communicate your brand in 90cm of space, the problem is not the space. It is the brand message. Tighten it up and the small table becomes more than enough. See the full kit range for setups designed to tell a story in a small footprint.

Compact Doesn't Mean Boring: Small Booth Inspiration

Somewhere along the way, vendors started equating "small booth" with "compromise." Smaller table, fewer products, less impressive. That is completely backwards. Some of the most jaw-dropping setups we have ever seen came from vendors with half a table and a lot of creativity. Here are eight compact booth ideas that prove small does not mean boring. 1. The Gallery Wall Build a clean vertical display with frosted panels and hang your work like a gallery exhibition. White backgrounds, even spacing, one piece per panel. It looks like a pop-up art show, not a market stall. A modular display kit in Core size handles this beautifully with 24 panels on a single table. 2. The Colour Block Pick one bold colour for all your accessories: tablecloth, business cards, packaging, price tags. Keep your display wall neutral. The contrast makes your booth instantly recognisable from across the room. Customers will remember "the orange booth" long after they have forgotten what table number you were. 3. The Minimalist Tower Two panels wide, five panels tall. One single vertical column in the centre of your table. Hang your hero product at eye level. Stack supporting pieces below. It takes up almost no table space and creates a striking silhouette that draws people in. 4. The Living Lookbook Instead of displaying products directly, display photos of your products being USED. Print lifestyle shots on cards and mount them on your display wall. Keep actual inventory behind the wall or under the table, and pull items out when someone asks. Your booth becomes a curated experience, not a shelf. 5. The Two-Sided Display If you have an end-of-row position, build your display as a freestanding wall and use BOTH sides. Front side faces the main aisle. Back side faces the cross aisle. Same footprint, double the visibility. This works especially well at L-shaped booth assignments. 6. The Shelf Showcase Skip the flat table display entirely. Build your panel wall with integrated shelves using PLA hooks rated to 5kg each. Stagger them at different heights. Your products sit on shelves at various eye levels, creating depth and visual interest on a flat surface. For even more shape on a small footprint, the Angled kits add any-angle panels that swing both ways, so a compact booth can have a little roof, an awning or an arch. 7. The Backlit Feature Wall Place a small LED panel behind your frosted display wall. The diffused glow makes your entire setup look high-end and gallery-quality. This is ESPECIALLY effective at indoor markets with dim overhead lighting where every other vendor looks flat and shadowless. 8. The Rotating Exhibition Bring three completely different layouts and swap your entire display every two hours. Morning visitors see one booth. Afternoon visitors see another. Use the modular click-together design to reconfigure in under five minutes between rotations. It keeps your booth fresh all day and gives you real data on which layout sells best. Small booths only feel limiting when you try to shrink a big booth concept into a small space. Design for the space you HAVE and you will end up with something way more interesting. Check the full kit range for kits that make compact creativity easy.

How To Say No To Extra Stock When Your Table Is Tiny

Your table fits maybe 20 items comfortably. You make 200. And every single time you pack for a market, that voice in your head says: "but what if someone asks for the thing I left at home?" That voice is lying to you. And it is costing you sales. The Overpacking Trap Bringing too much stock to a small space creates a cascade of problems that most vendors do not even recognise. Your table looks cluttered. Customers get overwhelmed by choice and buy nothing. You spend your setup time playing Tetris instead of building an inviting display. And you waste energy hauling product that never leaves the box. The hardest skill in small-space vending is not display design. It is saying no to your own inventory. The 80/20 Rule Applied to Your Table Go look at your last five events. Actually pull the numbers. For MOST vendors, around 20% of their products generate 80% of their revenue. Those are your display pieces. Everything else is backup stock or a distraction. Your tiny table should show your top sellers, your newest piece (one, not five), and one conversation starter. That is it. If you have room left over after those categories, you have room for breathing space and that breathing space is doing more selling than another product would. Building a Rotation Kit Instead of a "Bring Everything" Kit Pack three categories: Display (what goes up), Rotation (what swaps in after a sale), and Leave Behind (the stuff you convinced yourself to bring "just in case"). For your first few events with this system, bring the Leave Behind box and track whether you ever open it. Most vendors find they never do. A modular display kit helps here because vertical display space means your table surface stays clean for your top sellers. The wall handles your visual range and brand presence. The table handles transactions. What to Do When Someone Asks for Something You Did Not Bring This is the fear that drives overpacking. Someone will ask and you will not have it. Here is the reality: this is actually a GOOD problem. A customer interested enough to ask is interested enough to buy from your online store. Hand them a card, show them on your phone, offer to ship it. You just turned a missed in-person sale into a confirmed online customer with zero cost of display space. The vendors who build the best small-space setups are the ones who edit ruthlessly. Browse the full kit range and pick the size that fits your curated selection, not your entire catalogue. Frequently Asked Questions How do I decide which products make the cut for a small table? Start with sales data. Your top 5 revenue items and your newest release go on display. Everything else is rotation stock. If you do not have sales data yet, pick the pieces that get the most engagement on social media. Should I bring different stock to different types of events? Yes. A craft market audience and a comic convention audience want different things. Have 2-3 preset packing lists for different event types so you are not making decisions the night before every market.

The Small Space Lighting Trick That Makes A Huge Difference

You can have the best products, the cleanest layout, and the most eye-catching display at the market. But if your lighting is bad, none of it matters. Everything looks flat. Colours wash out. Customers walk past without stopping because nothing POPS. Good lighting is the single cheapest upgrade you can make to a small booth. And most vendors get it completely wrong. Why Top-Down Lighting Kills Small Booths Most venues have overhead fluorescent lights or industrial fixtures pointing straight down. This creates harsh shadows, washes out colour, and makes everything on your table look like it is sitting in a waiting room. In a big booth with pipe and drape, you can mount your own lighting rig to counteract this. In a small space, you do not have that luxury. The fix is angling light FORWARD and UPWARD from your table level, not relying on whatever the ceiling throws at you. Clip-on LED panels aimed at your vertical display create the kind of directional light that makes products glow without needing any overhead access. The Frosted Panel Trick This is the one that changes everything for small-space vendors. If your display wall uses frosted or translucent panels, placing a small LED light BEHIND the panels creates a soft backlight effect. Your products on the front are illuminated from behind with diffused, even light. No hot spots. No glare. Just a clean, gallery-quality glow. A modular display kit uses 35x35cm frosted PP panels that are designed for exactly this kind of lighting play. The frosted surface diffuses the light naturally, so even a cheap clip-on LED creates a surprisingly professional effect. Battery-Powered Is Non-Negotiable for Small Setups Small booths cannot afford to run extension cords across walkways or depend on venue power strips. Go battery-powered for everything. Modern rechargeable LED panels last 6-8 hours on a single charge, which covers a full market day. Charge overnight, swap in the morning. Position two small panels: one behind your display wall for backlighting, one clipped to the top of your display angled down at your table products. Two lights, battery powered, total cost under $50. The difference is enormous. Colour Temperature Matters More Than Brightness Do not blast your booth with the brightest light you can find. Colour temperature is what makes your products look RIGHT. Aim for 4000-5000K, which is a neutral daylight that does not skew warm or cold. Warm light (3000K) makes everything look cozy but kills accurate colour representation for art prints and textiles. Cool light (6500K) makes everything look sterile. Check the full kit range for display setups that work beautifully with simple LED backlighting. Frequently Asked Questions Can I use string lights instead of LED panels? String lights create ambiance but they do not actually illuminate your products well enough for customers to see detail and colour accurately. Use them for vibe if you want, but always pair them with directional LED panels for the actual product lighting. How do I attach lights to a modular panel display? Small clip-on LED panels attach to the top edge of your display wall. For backlighting, rest or clip the light on the back side of any panel. PLA hooks rated to 5kg can also hold lightweight LED strips along the back surface. Do I need different lighting for indoor versus outdoor markets? Outdoor markets under tents or gazebos still need supplemental lighting because tent shadows create uneven illumination. Indoor markets almost always need it. The same battery LED setup works for both.

Building A Two-Person Booth That Doesn't Feel Crowded

Mika and Jordan had a problem. They both sold art. They were dating. And they had signed up for a convention together without realising they would be sharing a single 6-foot table. One table. Two artists. Two completely different product lines. One weekend to make it work. Their first instinct was to split the table down the middle. Mika gets the left three feet, Jordan gets the right. Simple. Except three feet of table space is barely enough for one person, let alone someone trying to display prints, stickers, and pins. The Vertical Split What actually worked was going vertical and creating distinct zones using height instead of table area. They set up a modular display kit with a centre divider that went five panels high. Mika had a display wall on her side, Jordan had one on his. The panels gave each of them a 175cm backdrop without stealing any table surface. From the front, it looked like two mini booths side by side. Each had their own branding, their own colour scheme, their own vertical display space. The shared table was just a landing pad for products, not the main event. What They Learned About Shared Flow The first lesson was about customer flow. When someone stopped at Mika side, they would naturally glance at Jordan side too. The booth became a two-for-one stop. Instead of competing for attention, they were funnelling traffic to each other. The second lesson was about storage. With two people needing backup stock, under-table space gets TIGHT. They solved this by using the back of the display wall as hidden storage. Hooks on the reverse side held backup prints in clear sleeves. No boxes needed. Making It Feel Like Two Booths The key detail that made everything click was the centre divider panel. Instead of leaving it empty, they put a shared sign in the middle: their joint brand name for conventions. It turned a practical divider into a feature. Customers saw it as a collab, not two people crammed into one spot. By afternoon on day one, neighbouring vendors were asking them how they pulled it off. By day two, they had refined the layout even further, angling the side panels slightly inward to create a subtle U-shape that drew people in. They have shared a table at every event since. Not because they have to. Because it actually works better than two separate setups. The shared foot traffic and complementary products mean they both sell more than they would alone. If you are planning a shared booth, look at the full kit range for configurations that let two artists share one table without stepping on each other. The 35x35cm panels make it easy to build asymmetric layouts where each person gets exactly the space they need.

What Changes When You Downsize From A Full Table

We have talked to hundreds of vendors who went from a full 6-foot table to sharing a table, or dropping down to a half table, or switching from booths to market stalls. The story is always the same at first: panic. Less space feels like less opportunity. Fewer products on display means fewer chances to sell, right? That is the gut reaction. And it is almost always wrong. What actually changes when you downsize is your editing instinct. You HAVE to choose. You cannot bring everything. And that constraint forces you to figure out which five products actually drive 80% of your sales. Most vendors have never done that math. They bring everything because they can, not because they should. The vendors who thrive in small spaces are the ones who stopped thinking of it as a limitation and started treating it as a filter. Smaller tables push you toward better curation, cleaner displays, and faster setups. We have seen artists double their per-event revenue after downsizing because they finally stopped hiding their best work behind a wall of mediocre inventory. The practical side matters too. A modular display kit in Core size gives you a full vertical display on a half table. Setup takes 20 minutes. Teardown is faster. You are not hauling a van full of grid walls and zip ties anymore. That energy you save goes directly into talking to customers and making sales. Downsizing is not about having less. It is about showing less so people can actually SEE what you make. The best booths at any market are never the most packed ones. They are the ones where every single item has room to breathe. If you are stressing about an upcoming event with a smaller space than you are used to, take a breath. Grab your top five sellers, build up instead of out, and watch what happens. Browse the full kit range for setups that work in tight spaces.

Solving The Not Enough Wall Space Problem

Every vendor hits this wall eventually. You have products to show, ideas for your layout, maybe even some gorgeous signage ready to go. But your allocated space gives you a table and nothing else. No wall behind you. No pegboard. No pipe and drape. Just air. Here are seven ways to solve the not-enough-wall-space problem without begging your event organiser for a better spot. 1. Build Your Own Wall On the Table A modular display kit sits directly on your table and builds upward. Five panels high gives you 175cm of display wall. No drilling, no clamping to the table edge, no hoping the venue has attachment points. You bring the wall with you. 2. Use Both Sides of Your Display If you have a freestanding display, the back is usable too. Hang backup stock, extra signage, or business card holders on the reverse side. Corner booths can angle the display so both sides face foot traffic. That is double the wall space from the same footprint. 3. Go Narrow and Tall Instead of Wide and Short A two-panel-wide column that is five panels tall uses less table space than a four-wide, two-high layout but shows the SAME number of products. Vertical layouts also catch eyes from further away because they break the visual line of every other table-height display around you. 4. Add Shelves to Your Wall Flat wall space shows 2D work. But shelves turn that same wall into 3D product display. With 5kg-rated PLA hooks, you can add small shelves for jewellery, ceramics, small sculptures, or stacked print sets without needing a separate shelving unit eating your floor space. 5. Create an L-Shape or U-Shape Instead of one flat wall, angle your panels into an L or U configuration. This creates a mini booth environment even in an open-table setup. Customers step INTO your space instead of walking past it. The psychology shift is huge and it uses the same number of panels. With the any-angle panels in our Angled kits, which set at any angle, you can go one further and tilt an awning or a roof over that space. 6. Lean Into the "Floating Gallery" Look Frosted panels with prints or products mounted with clear standoffs create a gallery effect that LOOKS like you have more wall space than you do. The translucency lets light through and makes the display feel lighter and more open than solid walls would. 7. Stack Configurations Between Events The real power move is having enough panels to reconfigure between events. A Shapeshift kit with 46 panels lets you build a wide backdrop for markets with space, or a tall narrow tower for cramped pop-ups, using the exact same components. Check the full kit range for sizes. The wall space problem is really a thinking problem. Once you stop looking for walls and start building them, your layout options open up completely.

The Micro Market Setup That Still Looks Professional

You signed up for a micro market. Maybe it is a pop-up in a cafe, a weekend craft fair with half-tables, or one of those trendy curated markets where everyone gets a metre of space and a prayer. The table is small. Your brand still needs to look like it belongs there. Here is the thing most vendors get wrong: they try to shrink their normal setup down. That never works. A micro market setup needs to be DESIGNED small from the start. Start With a Centrepiece, Not a Catalogue Pick your three best sellers. That is it. Three. Everything else is backup stock hidden under the table or behind your display. When you only have a small surface, every item needs to earn its spot. A tight, curated selection looks intentional. A crammed table looks desperate. Use a modular display kit to add a vertical backdrop even in tiny spaces. The Core kit with 24 panels fits on a standard table and builds up to 175cm high. That gives you a professional wall behind your products without eating any table space at all. Branding Beats Quantity At micro markets, your brand presence matters more than your product range. One clean banner, consistent colours, and a cohesive display will outsell a table covered edge to edge with random items. People at curated markets are looking for brands they connect with, not bargain bins. Frosted PP panels work brilliantly here because they diffuse light and give everything behind them a clean, gallery feel. Pin your logo card or brand statement at eye level. Let the products speak below it. The One-Bag Test If your micro market setup does not fit in one bag, it is too big. The best small-space vendors can set up and tear down in 15 minutes. That means modular components that click together without tools, flat-pack storage, and nothing that needs a power drill or cable ties. A Core 24-panel kit packs into a 56x36x23cm case. That is carry-on size. Your entire professional display fits in one bag alongside your laptop. Height Creates Presence Even in a tiny footprint, going vertical makes you visible from across the room. Two panels wide and five high gives you a backdrop that catches eyes from the entrance. Other vendors with flat table displays blend into the background. You stand out because you built UP. Browse the full kit range to find the right size for your next micro market. Frequently Asked Questions Can I use a modular display on a half table? Yes. The Core kit is designed to sit on a standard 180cm table but it works on half tables too. You just build it narrower and taller. The panels are 35x35cm each so you can configure any shape that fits your space. What if the market does not allow tall displays? Check the rules first, always. Most markets cap height at 180cm which is fine since five panels high hits 175cm. If they cap lower, just build three or four panels high and use the extra panels as shelf surfaces instead of wall height.

How To Rotate Stock On A Table With No Room To Spare

You have one table. Maybe six feet of space if you are lucky. And somehow you need to rotate through 40+ products over a weekend without looking like you are running a garage sale behind your booth. Sound familiar? Stock rotation is one of those things nobody talks about until you are elbow-deep in prints at 2pm, digging for the one design someone saw on Instagram. There is a better way. And it starts with thinking vertical. Go Up, Not Out The single biggest unlock for table vendors with too much stock is adding height. A modular display kit builds five panels high at 175cm, which means you can show 15-20 pieces in the same footprint as a flat table layout showing 6. Stack your best sellers at eye level. Put your secondary pieces lower or higher. Rotate the eye-level row every few hours. Customers walking past see a FRESH booth every time without you needing more table space. The Swap Box System Pack your stock in labelled boxes by category or theme. Keep them under the table or behind your display wall. Every 2-3 hours, swap one section out completely. This works especially well with panels because you can pre-hang pieces on spare panels and literally click them into place in under a minute. The trick is not trying to show everything at once. A curated selection that changes throughout the day outperforms a cluttered table every single time. Use Your Vertical Space as Overflow Storage The back of a display wall is dead space that most vendors ignore completely. Use it. Hang backup stock on the reverse side using PLA hooks rated to 5kg per shelf. When something sells out front, reach behind, swap it in. Your customers never see the mess. You never have to dig through boxes. Timing Your Rotations Do not rotate randomly. Watch the traffic patterns. Morning crowds at markets tend to browse differently than afternoon crowds. Swap your display at lunch when foot traffic dips. Use that quiet window to completely refresh your layout so the afternoon wave sees something new. If you are doing a two-day event, swap HEAVILY between day one and day two. Repeat visitors are your best customers and they need a reason to stop again. Check the full kit range to find a setup that gives you the vertical space to actually pull this off. Frequently Asked Questions How often should I rotate stock during a single day event? Every 2-3 hours is the sweet spot. More than that and you spend too much time fussing with your display instead of selling. Less than that and walk-by customers see the same booth all day. What is the fastest way to swap pieces on a modular display? Pre-hang your rotation stock on spare panels. When it is time to swap, unclip the old panel and click the new one in. The whole thing takes under 60 seconds with ABS connectors. Should I bring more stock than I can display at once? Absolutely. Bring 2-3x what you can show at any given moment. The rotation strategy only works if you have fresh stock to cycle in. Just make sure it is organised in swap-ready boxes, not loose in a duffel bag.
60-second quiz5% off

Find your perfect kit in 60 seconds & score 5% off

Answer a few quick questions and we'll match you with the right kit fit.

What matters more for your booth?
The shape: roofs, awnings and angles
Any-angle panels for roofs, awnings and shaped fronts
The colour: the widest colour range
The most colours to pick from and to mix
What are your planned setups going to be?
Half table (90cm / 3ft)
Sharing a table or just starting out
Full table (180cm / 6ft)
The standard table at most cons, markets & fairs
Double, corner or booth (360cm / 12ft)
Two tables, an L-shape, or a full corner stand
Free-standing booth (no table)
A floor-standing wall, no table needed
Select all that apply
How long do you plan to use it?
Just one season, trying it out
Light use, a handful of events
A few years
Most artists land here
Heavy, long-term use
Built to last, with room to grow on extra parts and spares for years
What do you display?
Small prints, cards, pins & stickers
Flat, lightweight, easy to pin
Large prints & posters
A2 and up, needs room to breathe
Large items: Apparel, bags, figures, 3D merch, home goods
Heavier, bulkier pieces that need sturdy shelf framing
Jewellery, charms & keychains
Small and light, lots of little hooks
How tall do you want it?
Keep it low so my table and wall stay visible
A clean, low backdrop that frames your work
Build tall framing for maximum impact
A towering wall that pulls eyes from across the hall
What shape do you want your booth to be?
Classic cube shelves
Straight walls and stepped shelves
Angled roofs, cut corners or a curved front
Any-angle panels set at any angle for roofs, corners and U fronts
Which colours catch your eye?
Amber Yellow
Apricot
Avocado Green
Blue Sky
Forest Green
Grape Purple
Jade Green
Lavender Purple
Lilac Purple
Mint Green
Royal Blue
Scarlet Red
Snow White
Terracotta
Watermelon Pink
Yuzu Yellow
Select all that apply
Your perfect kit and 5% off are ready, pop in your email below to reveal both.
Unlock your kit & bonus 5% discount
Pop in your email and we'll reveal your 5% off, auto-applied at your cart.
Your result
Your perfect match
Your stall. Infinite installs.

Lightweight panels and snap on connectors shapeshift together.

Iron frame with frosted, water resistant surfaces for light & mighty structures.
Shapeshift kit part
Artistbooths Bundle Component Frosted Lavender Purple (PMS 2715 C) Panel Square (35x35 cm) [8-pack]
Shapeshift kit part
B-grade artist booth panel - discounted cosmetic-second stock
Shapeshift kit part
Shapeshift kit part
Artistbooths Bundle Component Frosted Lilac Purple (PMS 263 C) BOOF Panel Triangle (35x35 cm) [2-pack]
Shapeshift kit part
Shapeshift kit part
Shapeshift kit part
Shapeshift kit part
Shapeshift kit part
Half square panel in Frosted Avocado Green
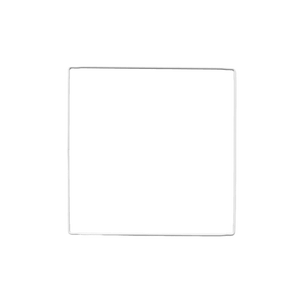
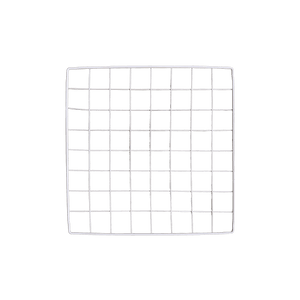
Artistbooths Single Connectors & Accessories White Square Wire Grid (35x35 cm)
Shapeshift kit part
Artistbooths Single Connectors & Accessories White Edge Connector

Stand out pop ups.Shapeshifting setups.

Mix & match custom shapes & colours that match your brand.

Shop
Scroll

build a booth that builds a crowd

Little parts. Big payoff.

Why makers love our booths.

Every detail pulls its weight.

Stand out, sell out.

Be the eye-catching brand whose cohesive look draws a crowd and gets remembered.

Grow with you.

Enough parts to range products from small table to large booth.

Shape your brand.

Triangles, rectangles, hinge panels and connectors, in colours you mix yourself, for infinite display setups.

Be memorable.

Seasonal colours keep your brand unique. Frosted finish gives your art a soft spotlight.

Range & sell more.

Self-serve more customers with parts that make the most of smaller spaces.

Strong where it counts.

An iron core holds heavy stock whilst water-resistant surfaces shrug off spills and weather.

Packs light, carries safe.

Panels weigh 150g each. The double-wall carry box protects up to 30 decorated panels every trip.

Spares for years.

Every kit packs extra parts, so when you scale up or lose a piece you can keep running your vision.

Your products centre stage

Light diffusing panels.

Anti glare & bright product display

Pick a Display kit to Shapeshift your brand.

Choose a setup size and colours & explore examples of how you could use our kits.

Only available
2aMain colour Main colour
Colour 1
Swap half your square panels to a 2nd colour
Swap half your multi-shape panels to a 2nd colour
2bSecond colour Second colour Free
Swap half your square panels to a 2nd colour
Swap half your multi-shape panels to a 2nd colour
Colour 2 Free
4. Bundle & save add-ons

Display more with add-on packs.

Shapeshift Kit 46 Multi-Shape Panel and Accessory Kit Add-on

Shapeshift Kit 46 Multi-Shape Panel and Accessory Kit Add-on

$575.10

Grape Purple Frosted

Square Panel [24 Pack] (35cm / 13.8in) Add-on

Square Panel [24 Pack] (35cm / 13.8in) Add-on

$405.00

Scarlet Red Frosted

Self Serve Hook with wire grid T clip  8cm [10 pack] Add-on

Self Serve Hook with wire grid T clip 8cm [10 pack] Add-on

$36.00

Self serve display Grid & Intersection Hook expansion pack [12/24 Mixed pack] Add-on

Self serve display Grid & Intersection Hook expansion pack [12/24 Mixed pack] Add-on

$90.00

Multi Connector Expansion Pack - White - Bundle & Save [16/32 mixed pack] Add-on

Multi Connector Expansion Pack - White - Bundle & Save [16/32 mixed pack] Add-on

$108.00

Square Wire Grid Expansion Pack - 35cm x 35cm/13.7"x13.7" Add-on

Square Wire Grid Expansion Pack - 35cm x 35cm/13.7"x13.7" Add-on

$54.00

Mini Rectangle Panels [5-Pack] (17cm x 35cm/6.69in x 13.78in) Add-on

Mini Rectangle Panels [5-Pack] (17cm x 35cm/6.69in x 13.78in) Add-on

$90.00

Amber Yellow Frosted

Foot Connector Expansion Pack [4 Pcs] Add-on

Foot Connector Expansion Pack [4 Pcs] Add-on

$53.10

Mixed Single & Double Wire Shelf Clip [9 pack] Add-on

Mixed Single & Double Wire Shelf Clip [9 pack] Add-on

$40.50

Booth Wheel & Wheel Connector - white - [4 pack] Add-on

Booth Wheel & Wheel Connector - white - [4 pack] Add-on

$54.00

Corner Connector Expansion Pack [8 pack] Add-on

Corner Connector Expansion Pack [8 pack] Add-on

$54.00

Edge Connector [8 pack] Add-on

Edge Connector [8 pack] Add-on

$54.00

Single Shelf Wire Clip White [5 pack] Add-on

Single Shelf Wire Clip White [5 pack] Add-on

$31.50

Double shelf wire clip white [4 pack] Add-on

Double shelf wire clip white [4 pack] Add-on

$27.00

Self serve display Grid & Fold Hook expansion pack [12/24 Mixed pack] Add-on

Self serve display Grid & Fold Hook expansion pack [12/24 Mixed pack] Add-on

$99.00

Foldable Self Serve Hook (with wire clip) - [20 pack] Add-on

Foldable Self Serve Hook (with wire clip) - [20 pack] Add-on

$72.00

White

Foldable Self Serve Hooks (with adhesive sheet) [20 pack] Add-on

Foldable Self Serve Hooks (with adhesive sheet) [20 pack] Add-on

$45.00

White

Metal mallet (with dual rubber/soft tap sides) [1 pc] Add-on

Metal mallet (with dual rubber/soft tap sides) [1 pc] Add-on

$36.00

Panel Clamp Black 3cm Mouth [4 pcs] Add-on

Panel Clamp Black 3cm Mouth [4 pcs] Add-on

$36.00

Foldable Croc Hooks (adhesive) - 10-pack

Foldable Croc Hooks (adhesive) - 10-pack

$50.00

Black

Foldable Croc Hook (clip) - 10-pack

Foldable Croc Hook (clip) - 10-pack

$80.00

Black

Your bundle
Free express shipping deal
Orders over $300 AUD
dhm
Free Exp. Shipping (2-7 bus.days) d h m
Selection
★Rated 5.0/5 by sellers at markets & cons
American Express Apple Pay BancontactGoogle Pay Mastercard MB WAY Shop Pay Union PayVisa JCBDiscoverDiners ClubMaestro
🌐 Globally express tracked🇦🇺 Designed in Oz★ Rated 4.9/5 by sellers at markets & cons

Swing into new degrees of freedom.

Meet the any-angle panel. A panel the world has never seen before. It swings both ways, it is the missing piece of the line-up, and it unlocks infinitely more designs.

Flips into an awning

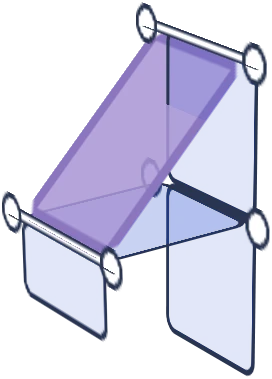
The panel drops onto a square that stands out from the wall, and the half panel on its edge swings down to hang straight.

Best of booth worlds

Angled Duo comes in two colours. Mix them panel by panel.

Rounds off your booth

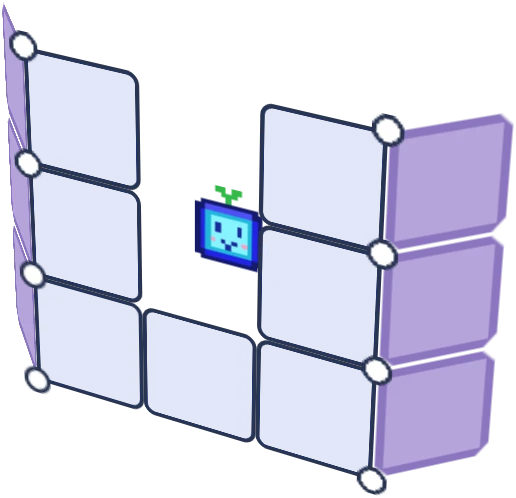
Any-angle panels at both ends turn sharp corners soft, so your art carries round the booth and draws people in.

Stands out in every direction

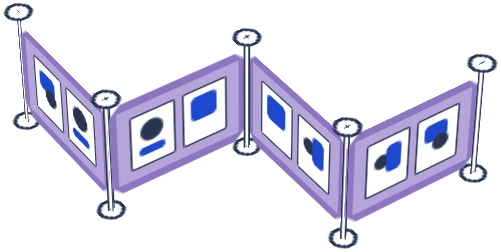
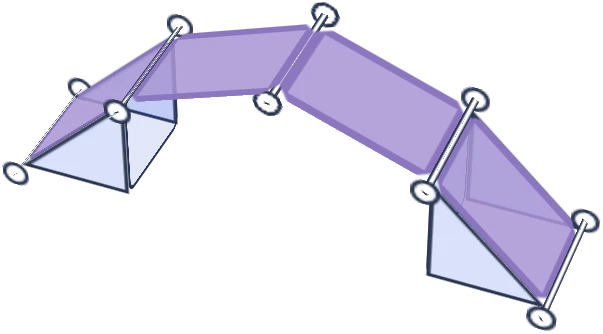
A zigzag wall shows your art from several angles at once.

Swings both ways

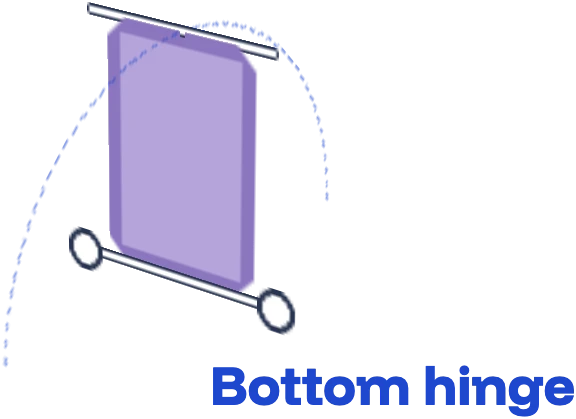
Put the connectors on the top rod or the bottom rod. It swings 180 degrees from either end.
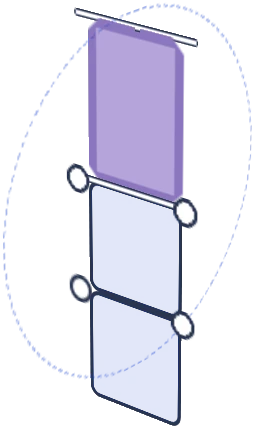
turned from hanging down
Sets at any angle

The rod turns freely in its connectors. Whatever the free end meets sets the angle.
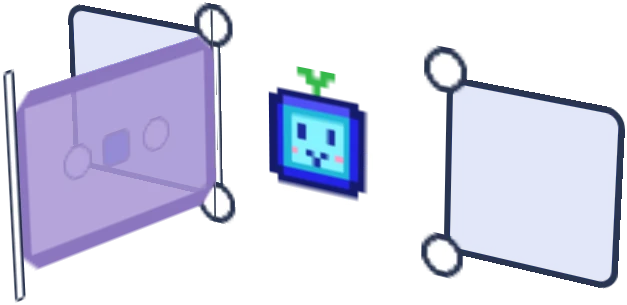
Swings like a door

On its side between two squares, it opens to let you through and shuts behind you.
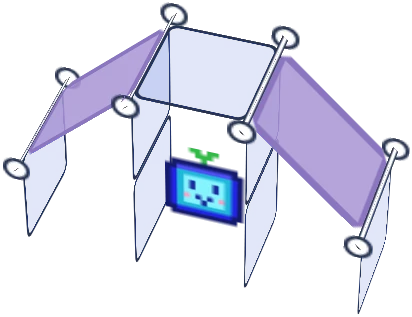
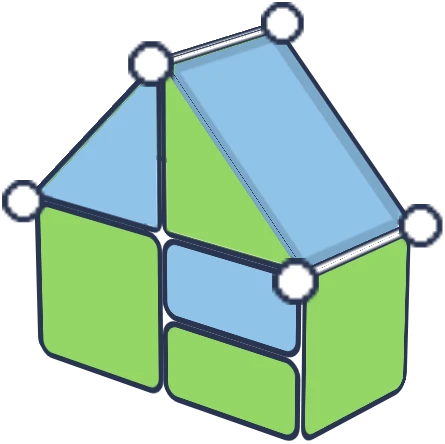
Panels can form a roof

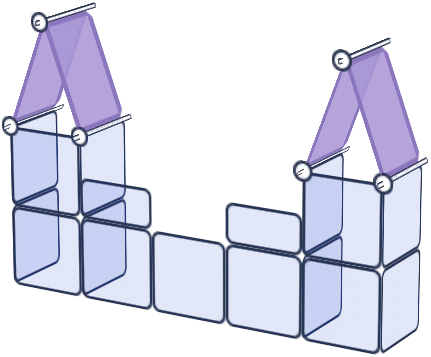
Chamfered, arched or pointed: two to four any-angle panels meet at the top.

Half square
Square
Triangle
Any-angle panel
Half square
The missing piece

It sits on the triangle’s long edge, the spot no other panel could fill, and clicks into 4 connectors for a clean slant with no gap.

A4A5A6A4A5A3
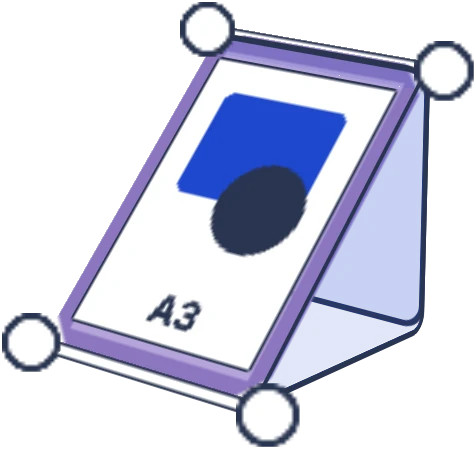
Carries up to A3 prints

One A3, or an A4 with an A5 and an A6, upright or turned sideways.

Slants onto a square

A slope for stickers and keychains that faces your customer.

frosted

Aqua Teal

new limited edition kits

frosted

Build your own
Duo color display
Colorful display

Modular cube panels that snap together in minutes. Pick a color to start with and build & grow. for years.

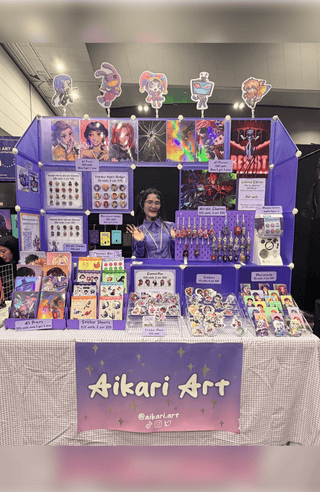
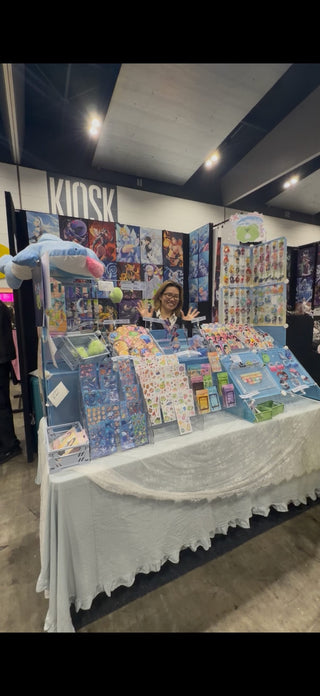
Modular artist display booth at a craft market
Indoor pet playpen enclosure